

Follow along with the video here:
Introduction
Are you curious about how to build your own chatbot? In this post, I’ll teach you how to use the same language models that ChatGPT uses to build your own AI Chatbot. I’ll go through the process on how to create your own app with the ChatGPT API as well as give you an app I already coded up where you just have to replace a value with your API key. Code is included.
Sign Up for OpenAI
The first thing you need to do is sign up for OpenAI. If you have used ChatGPT before, I’m assuming you already have an account. If not, go to openai.com and sign up. Once you have an account, we can start using the API. Let’s go through OpenAI’s quickstart example to see how we can hook everything up.
Quickstart Example
In this example, we will be using the completions endpoint of the OpenAI API. This endpoint accepts a text input and returns a response based on your input.
Example API Request & Response:
| Prompt | Completion |
|---|---|
| Write a tagline for an ice cream shop. | We serve up smiles with every scoop! |
Building the Quickstart Application
Assuming you have Node.JS installed, let’s copy OpenAI’s quickstart repo from Github.
git clone https://github.com/openai/openai-quickstart-node.git
Create a copy of the env file
cd openai-quickstart-node
cp .env.example .env
Generate an API key

Paste the API key into the .env file you created

Run the app
npm install
npm run dev
Open http://localhost:3000 in your browser and you should see this:
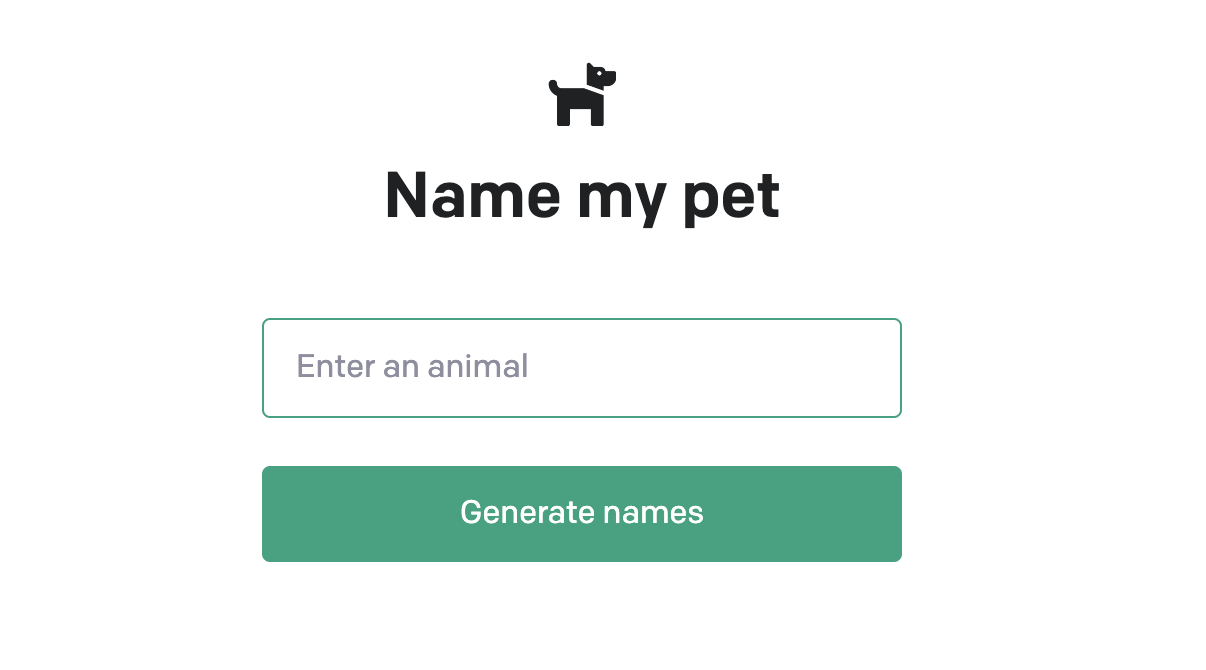
Putting in any animals should give you names for them. Now that you have familiarized yourself with using the API and have created an API key, let’s create our own chatbot.
Creating Your Own Chatbot
Setup
The first thing we need to do is setup our app. Our stack will be Node.JS as well as vanilla HTML/CSS/Javascript for simplicity.
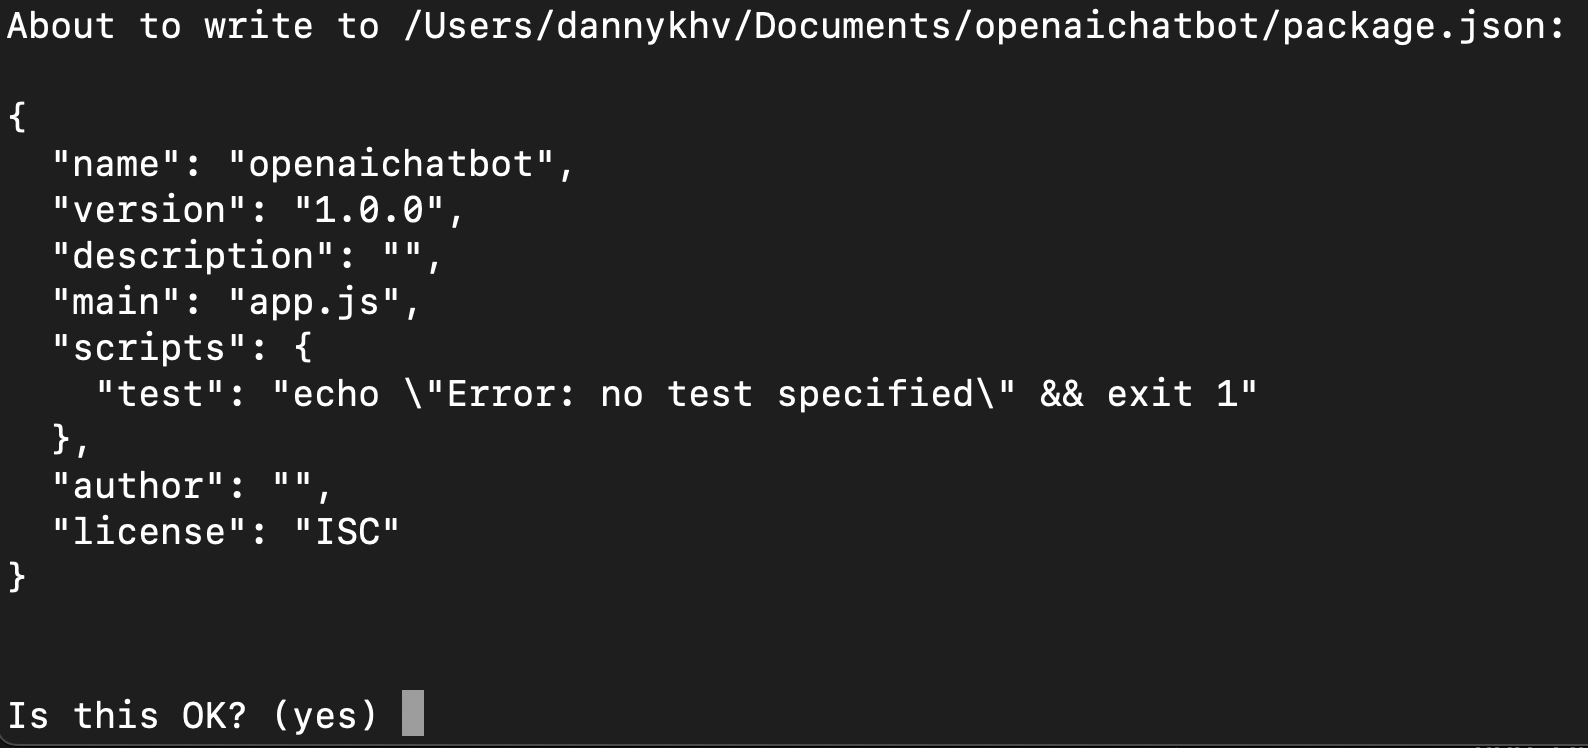
Create the folder and Node app:
mkdir openaichatbot
npm init
Use the default for all the npm settings EXCEPT for the entry point. Change this to app.js.
Let’s create all of our files. Create a file structure that looks like this:
├── public
│   ├── js
│   │   ├── script.js
│   ├── index.html
├── app.js
├── package.json
├── package-lock.json
└── .gitignore
Interface
The next thing we want to do is create the interface. In other words, let’s create all of the text-boxes and stuff we need for our app. I’ll be using Bootstrap 5.2 for this.
To start, our index.html file will look like this:
<!DOCTYPE html>
<html lang="en">
<head>
<meta charset="UTF-8">
<meta http-equiv="X-UA-Compatible" content="IE=edge">
<meta name="viewport" content="width=device-width, initial-scale=1.0">
<title>My Chatbot</title>
<link href="https://cdn.jsdelivr.net/npm/bootstrap@5.2.3/dist/css/bootstrap.min.css" rel="stylesheet"
integrity="sha384-rbsA2VBKQhggwzxH7pPCaAqO46MgnOM80zW1RWuH61DGLwZJEdK2Kadq2F9CUG65" crossorigin="anonymous">
</head>
<body>
<div class="container mt-5 w-50">
<h1 class="text-center">My Chatbot</h1>
<div class="card">
<div class="card-header">
Chat History
</div>
<ul id="chat-history" class="list-group list-group-flush">
</ul>
</div>
<div class="input-group">
<span class="input-group-text">
<svg xmlns="http://www.w3.org/2000/svg" width="16" height="16"
fill="currentColor" class="bi bi-person-circle" viewBox="0 0 16 16">
<path d="M11 6a3 3 0 1 1-6 0 3 3 0 0 1 6 0z" />
<path fill-rule="evenodd"
d="M0 8a8 8 0 1 1 16 0A8 8 0 0 1 0 8zm8-7a7 7 0 0 0-5.468 11.37C3.242 11.226 4.805 10 8 10s4.757 1.225 5.468 2.37A7 7 0 0 0 8 1z" />
</svg> You
</span>
<textarea id="user-input" class="form-control" aria-label="With textarea"></textarea>
</div>
<div class="text-center">
<button id="submit" type="button" class="btn btn-primary mt-2" >Submit Prompt</button>
<div id="spinner" class="spinner-grow text-primary visually-hidden mt-2" role="status">
</div>
</div>
</div>
<script src="https://cdn.jsdelivr.net/npm/bootstrap@5.2.3/dist/js/bootstrap.bundle.min.js"
integrity="sha384-kenU1KFdBIe4zVF0s0G1M5b4hcpxyD9F7jL+jjXkk+Q2h455rYXK/7HAuoJl+0I4" crossorigin="anonymous">
</script>
<script src="js/script.js"></script>
</body>
</html>
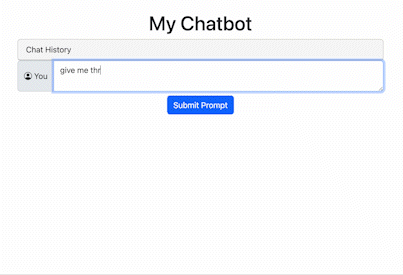
This will give us a simple text box and a button that looks like this:

Backend
Let’s hook up the backend so we can make calls using the OpenAI API. First, we want to install our npm packages:
npm install openai
npm install express
npm install dotenv
In the previous quickstart example, we created a .env file. Copy this file over to our new chatbot directory and add a variable OPENAI_ORG. This is going to be your organization string which you can get from your organization settings.
Your .env file should look like this:

Our app.js should look like this:
const openai = require('openai');
require('dotenv').config();
const express = require('express');
const path = require('path');
const app = express();
const port = 8080 || process.env.PORT;

app.use(express.json());
app.use(express.static('public'));
app.use(express.urlencoded({ extended: true }));

//Configure OpenAI
const configuration = new openai.Configuration({
    organization: process.env.OPENAI_ORG,
    apiKey: process.env.OPENAI_API_KEY,
});

const openaiapi = new openai.OpenAIApi(configuration);


app.get('/', (req, res) => {
    res.sendFile(path.join(__dirname, '/index.html'));
});

app.post('/chat', async (req, res) => {
    const messages = req.body.messages;
    const model = req.body.model;
    const temp = req.body.temp;

    const completion = await openaiapi.createChatCompletion({
        model: model,
        messages: messages,
        temperature: temp,
    });
    res.status(200).json({ result: completion.data.choices });
});

app.listen(port, () => {
    console.log(`Example app listening on port ${port}`);
});
Our script.js file will look like this:
//Get reference to our submit button and chatbot field
const submit = document.getElementById("submit");
const responseField = document.getElementById("response");
const userInput = document.getElementById("user-input");
const chatHistory = document.getElementById("chat-history");
const loading = document.getElementById("spinner");

let promptResponses = [];

//Our call to the API
const generateResponse = async () => {
    //Get the user input field value
    //Set loading spinner
    loading.classList.remove("visually-hidden");
    submit.classList.add("visually-hidden");
    const input = userInput.value;
    const response = await fetch('/chat', {
        method: 'POST',
        body: JSON.stringify({
            model: "gpt-3.5-turbo",
            messages: [{"role": "user", "content": input}],
            temp: 0.6
        }),
        headers: {
            'Content-Type': 'application/json'
        }
    });

    const responseData = await response.json();
    const message = responseData.result[0].message.content;
    console.log(message);

    //Store our previous messages
    promptResponses.push({question: input, response: message});
    //Clear both fields
    userInput.value = "";

    const historyElement = document.createElement('div');
    historyElement.innerHTML = `<li class="list-group-item">Prompt: ${input}</li>
    <li class="list-group-item"> Response: ${message}</li>`;
    chatHistory.append(historyElement);

    //Stop loading spinner
    loading.classList.add("visually-hidden");
    submit.classList.remove("visually-hidden");

}

//Assign onclick method
submit.onclick = generateResponse;
Now that we have all of our files, all you have to do is start your node server:
node app.js
Visit http://localhost:8080/ in your browser and see our app at work :)
Here’s what it looks like:
See if you can add a slider for temperature and a switcher to change models.
Get all of the code on Github here.
Ads
